FINAL FANTASY XIV Alpha Test Manual
FINAL FANTASY XIV is a cross-nation, cross-platform massively multi-player online role-playing game (MMORPG) that brings together people from all across the world to compete, cooperate, and communicate within the virtual fantasy realm known as Eorzea. While solo adventuring is always an option, most will agree that joining forces with their fellow gamers not only makes the game that much easier, but that much more fun as well!
* The Alpha/Beta versions contain only a fraction of what is planned in the full version. This includes playable races and clans, character customization options, selectable classes, and available areas, to name a few.
1. After logging in, select “New” from the Character Selection screen.
2. Select your character’s race, clan, and gender.
3. Choose a preset appearance for your character.
4. Customize various aspects of your character’s appearance via the available menus.
5. Select your character’s starting class*.
6. Select your character’s nameday (birthday) and guardian (patron deity).
7. Input your character’s first and last name.
8. Select the city-state in which you wish to begin your adventure.
9. Finally, select “Enter” to create your character and begin the game.
* Classes
In FINAL FANTASY XIV, a player’s class is determined by the arm or tool in his/her hand. The class chosen during character creation simply determines the items a player begins the game with. Players can change their class at any time by simply equipping different items they purchase, find, or create.
– Note
In the Alpha Version, a character’s race, clan, gender, nameday, and guardian do not affect his/her attributes.
At the onset of the game, you will find yourself on a boat, though at this point your character is already within what is called an instanced area, meaning it will not be occupied by any other players.
* Instanced areas, or instances, are areas in which only players directly related to or involved in what happens within may enter. The initial stages of gameplay in the Alpha Test will take place in instanced areas which only single players may occupy.
Instances will only be used for special events, such as the game’s opening sequence. For the most part, gameplay will take place within public areas occupied by any of a number of players.
As you progress through the opening event, the ship will eventually make port. After arriving, speak to the NPC Hob, who will be located directly ahead of you. At certain points in the game, Hob will present you with a list of options in accordance with your progress. For now, select the option presented to continue through the current event.
After speaking with NPC Hob and proceeding to the location to which you have been directed, there will be another NPC named Baderon who will present you with another set of options. After speaking to Baderon, you will automatically be transported from to a public area.
In public areas you will come across many other players. As fellow adventurers, it is up to you to make the most of your time in Eorzea together!
1. Display Name
The color of a display name reveals important information.
White – Other PCs
Blue – Party members
Green – NPCs
Yellow – Enemies
Red – Engaged enemies
* Semi-Transparent Display Names
When the display name of a PC is semi-transparent, it indicates that player is currently in a different area than you. These PCs are still displayed on-screen to help contribute to the seamless transitioning between areas. However, players should note that party invites cannot be extended across areas.
2. Minimap
The minimap displays the immediate vicinity around you, the direction you are facing, the direction the camera is facing, and the position of various NPCs.
3. Log
This display contains all of the various logs used to display text within the game, such as the system log, combat log, and chat log. Players may input text by selecting the chat prompt area.
4. Unit Frame
The unit frame displays various aspects of your character’s status, such as HP, MP, and TP.
5. Connection Status
1. Action Bar
This bar displays the various commands available for use in relation to the PC or NPC you are currently targeting.
2. Action Gauge
This gauge tells how much time is left before the next action may be executed. Though there are a few exceptions, for the most part all attacks, abilities, weapon skills, and spells require that the action gauge be full.
For certain classes, a secondary action gauge will appear when a shield is equipped in the off hand. All shield-related commands will make use of this gauge.
The action gauges of the main hand and off hand are entirely independent of one another. Should a character have a shield equipped in their off hand, two action gauges will be displayed simultaneously.
3. Effect Gauge
The effect gauge comes to life once the action gauge has completely filled. When a command is executed, the state of the effect gauge will determine certain bonuses to factors such as accuracy, power, or potency. These bonuses apply to all actions, both physical and magical.
– Other
– Passive Mode and Active Mode
“Passive Mode” is the designation given to the state in which a player’s arm or tool is not drawn. In this mode, hit points regenerate automatically.
“Active Mode” refers to the state in which a player’s arm or tool is drawn. In this mode, various battle commands are available, but movement speed is reduced in comparison to passive mode.
– Arms and Tools
There are a vast array of arms and tools in FINAL FANTASY XIV which allow players to assume the role of any of a number of classes. However, the following conditions should be kept in mind when changing equipment.
Equipping Arms – Players must be in passive mode and not engaged with an enemy.
Equipping Tools – Players must be in passive mode.
During the Alpha Test phase, there will be a total of nine types of arms and tools available (swords, hand-to-hand weapons, axes, polearms, bows, conjurer arms, thaumaturge arms, hammers, and pickaxes). Players can change their class simply by virtue of changing the arm or tool they have equipped in their hand.
The Flow of Battle
1. Ready an arm or tool, changing from passive mode to active mode.
2. Target an enemy.
3. Select a command from the action bar, and make use of the action and effect gauges to execute it effectively.
4. Strategize with other party members, deciding upon an appropriate Battle Regimen*.
5. Gain victory in battle to be rewarded with experience and skill points.
6. Obtain and distribute any loot dropped by the enemy.
* Battle Regimen
Battle Regimens are combat tactics which party members may employ against a single enemy. By coordinating and executing battle commands in a precise order, players may cause certain additional beneficial effects to occur.
A Battle Regimen begins with the stacking of battle commands. All party members who wish to take part in the Battle Regimen must stack their actions in the correct order against the desired target. One of the members then initiates the Battle Regimen, and the stacked actions will be executed automatically.
Step 1: Consult with other party members to determine the best Battle Regimen to use against a specific target. The battle commands and the order in which they are to be executed should all be decided.
Step 2: Wait until your position in the queue comes around to switch to Battle Regimen mode and select the battle command you wish to stack.
Step 3: After all participating party members have stacked their battle commands, one of the party members selects to initiate the Battle Regimen.
Step 4: Once the Battle Regimen is initiated, the stacked battle commands will all be executed automatically, chaining together to create additional effects.
Please note that factors such as distance from the enemy may prevent stacked battle commands from being executed once the Battle Regimen is initiated. In these cases, the Battle Regimen will not end, but will instead proceed on to the next command in the queue.
Enemy Toughness
An enemy’s degree of difficulty is represented by the color of the circle located in the extreme left portion of the unit frame. This display takes into account whether the player is solo or a member of a party.
Red – Incredibly Tough
Orange – Very Tough
Yellow – Tough
Green – Decent Challenge
Blue – Easy Prey
Physical Levels and Skill Ranks
In FINAL FANTASY XIV, a character’s progress is measured in two ways. Physical levels represent one’s actual physical development, while skill ranks measure how adept one is with various arms and tools.
– Physical Levels
Characters gain physical levels by accumulating a certain amount of experience points.
(During the Alpha Test phase, experience points will be obtainable only by achieving victory in battle.)
– Skill Ranks
Skill ranks are gained by accumulating skill points from various endeavors, such as combat or crafting. As a character’s skill rank increases, they will learn new actions, such as abilities and weapon skills.
* Physical level and skill rank caps will be set at 20 for the Alpha Test Phase.
Setting Actions for Use
Actions that have been acquired by a character can be set to the action bar for use. During the Alpha Test phase, the maximum number of actions available at any given time will be limited to 20.
Barring a few class-specific exceptions, actions will be available for use even when using a class different from the one on which the action learned. However, the power and efficacy of each action is determined by its affinity with the character’s active skill.
The Spoils of War
Any items received after a battle will be placed in a player’s loot list. During party play, items are distributed randomly to the lists of each member.
After a certain period of time, items on a loot list will be automatically moved to a player’s inventory. Should the player’s inventory be full, the items will be lost.
Items on a loot list are not considered in a player’s possession until they are added to his/her inventory. Until then, any items, including those which are rare (untradeable) and unique (players can possess no more than one), can be transferred to another party member’s list.
* Items received while mining/quarrying will also be added to the loot list before being moved to a player’s inventory.
If a character’s HP is reduced to 0, he/she will be “knocked out” and no longer able to move or act. A character can be revived by selecting “Return” from the main menu and choosing a destination from the listed aetheryte camps or aetherial gates.
* If a character is KO’d while participating in a levequest, he/she will be teleported back to the corresponding aetheryte.
* For the duration of the Alpha Test, characters KO’d will receive a weakness penalty which will not only lower total HP, but also reduce the speed with which their action gauge fills, as well as increase the length of casting times. This penalty will last five minutes before wearing off.
Rifts along the surface of Hydaelyn can cause “leaks” from which the planet’s lifeblood, aether, can escape. By harnessing the power from concentrated deposits known as “aetheryte,” the residents of Eorzea have seen a marked improvement in everyday life. Below is a list of the three most common types of aetheryte, and their benefits.
Aetheryte Crystals
Located in towns and camps, these giant crystalline objects are most often used as the starting places of levequests, due to their accessibility.
Upon approaching an aetheryte crystal, an Aetheryte option will appear. Selecting this will automatically do four things:
1. Restore all HP and MP.
2. Set the aetheryte as your home point (to where you will return when warping).
3. Register the location to your teleport list (first visit only), thereby allowing you to teleport to that aetheryte whenever you choose.
4. Give you the option to begin any levequests in your possession originating from that location.
Aetherial Gates
Aetherial gates are permanent discharges of aether located in various places around Eorzea. While not as concentrated as aetheryte crystals, the gates can still be used to instantly restore HP and MP, and set your home point.
Aetherial Nodes
Aetherial nodes are temporary phenomena which usually appear only after completing a levequest. They can be used to teleport instantly back to the aetheryte crystal at which a player began that quest. Only players who took part in the levequest can access the nodes, which will fade if not used promptly.
Players can return to their previously set home points at any time by selecting the Return option from the main menu. However, if a player is participating in a levequest, selecting this option at that time will result in teleportation back to the aetheryte crystal or aetherial gate used to activate the quest. The Return command can also be used while KO’d to revive your character.
By selecting Teleport from the main menu, a player can teleport their entire party to any aetheryte crystal location they have already visited. When one party member uses the Teleport option, a confirmation button will be sent to all other members, allowing them to decide whether or not they also wish to be teleported.
*Please note, both the Return and Teleport options can only be used when in passive mode.
To log out of FINAL FANTASY XIV and exit the game, select Logout from the main menu. The logout process requires 30 seconds to complete and can be cancelled at any time by inputting another command.
*Please note, players cannot log out while in active mode.
1. Region: The name of the region currently being displayed.
2. Area: The name of the area currently being displayed within the above-mentioned region.
3. Camp: The name of the aetheryte camp presiding over the current area.
4. Aetheryte camp location.
5. Player’s current position and directional bearing.
6. Aetherial gate location.
7. Map Menu Button: Select Change Map to view other acquired maps.Players can keep track of the quests they have accepted by viewing the Journal found in the main menu. Clicking on the header will bring up the following options: Levequests (Regional and Local) and Quests (Class Quests). Select the corresponding category to view all related journal entries.
* Please observe general online manners and etiquette when communicating with others.
Chat Modes
[Say]
Any message input in the say chat mode can be seen by any and all players in the immediate vicinity. It is the default chat mode, and messages displayed in this manner will appear in white. This chat mode is activated by prefacing a message with either /say or simply /s. In addition, the active chat mode may be set to say mode by entering the command /say without a message following.
[Party]
Any message input in the party chat mode can be seen by any and all party members. Messages displayed in this manner appear in blue. This chat mode is activated by prefacing a message with /party or simply /p. In addition, the active chat mode may be set to party mode by entering the command /party without a following message.
[Tell]
Any message input in the tell chat mode can be seen only by a single designated player. Messages displayed in this manner appear in pink. This chat mode is activated by prefacing a message with /tell or simply /t . The active chat mode cannot be set to tell mode. During the Alpha Test phase, PC names must be entered in their entirety (first and last names).
[Shout]
Shout chat mode is much like say chat mode, with the sole difference being that messages can be seen by players in a much wider area. Messages displayed in this manner appear in light pink. This chat mode is activated by prefacing a message with either /shout or simply /sh. The active chat mode cannot be set to shout mode.
Examples of Chat Commands
* All commands must begin with a / (forward slash) and contain only half-width characters.
Emotes
Emotes are a collection of expressions and gestures that can be used to convey the emotional state of your character. The emote menu is bound to the E key in the default keyboard setup, and can also be accessed by selecting the second icon from the right on the action bar. By forming a party with others, players will be able to defeat monsters and complete guildleves of a difficulty unthinkable to the solo adventurer. A single party may contain up to 15 characters.
Forming a Party
To form a party, simply target and select the player that you wish to invite, and then select the Invite option that appears. If your invitation is accepted, the party will be formed automatically, with the person who sent the initial invitation becoming the party leader. The leader is the only member of the party who can invite additional members.
* Players who are already in a party cannot be invited.
Accepting a Party Invite
If another player invites you to a party, a Join party? button will appear on your screen. Select this to bring up a prompt displaying the options of Yes, No, and Cancel. Choose Yes to accept the invitation.
Party Commands
– Promote
The Promote command allows players to change the party leader. It may only be carried out by the current party leader.
– Oust
The Oust command allows players to remove members from a party. It may only be carried out by the current party leader.
– Leave
The Leave command allows players to disband from a party.
Once a Party is Formed
Following the formation of a party, the unit frames of all party members will be displayed together in the lower right portion of the screen. The party leader will be designated by the presence of a yellow diamond to the immediate left of the leader’s name.
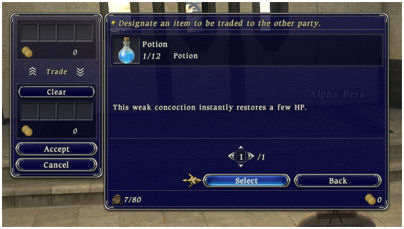
The Trade command allows you to exchange items and gil with other players.
1. To initiate a trade, simply target and select a player, and then select the Trade option that appears.
* The recipient of a trade request will be see an Accept Trade? button. Selecting this will present the player with the options of Yes, No, and Cancel. Choose Yes to accept the request.
2. Accepting a trade request will automatically open the trade window.
3. Both players set the items and/or gil they wish to exchange in the trade slots provided.
4. Select Accept to complete the trade process.
* Selecting Cancel will abort the trade entirely.
Bazaars afford players the ability to sell and purchase items to and from one another. A player who has a bazaar set up will have the bazaar icon displayed next to that player’s name.
Operating Your Bazaar
A player’s bazaar can be set up to contain the items that player wishes to sell to others.
1. From the main menu, open the Item List and then select the Bazaar option. Highlight the item that you wish to sell, and then press Bazaar again.
2. In the window that follows, set the unit price at which you wish to sell your item(s).
* Note that 5% of the designated unit price will be taken as tax when the item sells. For example, an item being sold in a bazaar for 100 gil will require the purchasing player to pay 100 gil, but the player selling the item will receive only 95 gil from the transaction.
3. Having items in your bazaar purchased by other players will result in the gil being automatically added to your inventory.
Browsing Bazaars
By browsing the bazaars of others, players can purchase items.
1. Target and select a player with a bazaar and press the Browse button that appears. Then select the Selling option to view the items that player has up for sale.
2. Select the item you wish to purchase to complete the transaction.UI
Q: Can I undo attribute points already allocated?
A: With great power comes great responsibility. The Twelve have deemed you unworthy of that responsibility (at this time).
Battle
Q: I’ve arrived in Limsa Lominsa and watched the event scene with Baderon, the potty-mouthed proprietor of the Drowning Wench. What do I do next?
A: Access your Journal from the main menu. Select Class Quests to view a log of all that has transpired, as well as what lies immediately ahead on your path to adventure.
Q: My weapon is drawn, why isn’t that plague rat DEAD!?
A: Just as Van Ghoh could have never painted a single sunflower without clicking the Paint button in his action menu, an adventurer cannot thrust, swing, or throw her weapon until the corresponding button is clicked.
Q: Do blacksmiths and miners have any battle options other than throwing stones?
A: Not during the Alpha/Beta tests. Though perhaps through prayer will the Twelve one day grant the Disciples of the Land and the Hand with new ways to fell Eorzea’s nasty beasties.
Items
Q: Why can’t I fight barehanded?
A: Because the Twelve do not wish it. Eorzean adventurers must have a weapon or tool equipped at all times.
Q: Where can I learn synthesis recipes? I tried copying the recipes introduced in certain levequests, but was told I do not have the crystal required for starting the synthesis.
A: Synthesis recipes are as elusive as the answers to questions such as the meaning of life and our purpose here on Hydaelyn. They must be sought for, and only the diligent shall be rewarded.
While normal synthesis requires the correct combination of crystal type and amount, levequest synthesis is often simplified, with the quest clients providing adventurers with crystals, thus their absence from the levequest recipes.
Q: How do I obtain crystals?
A: Crystalline manifestations of the planet’s aether are rare, but under special circumstances will form within the bodies of certain creatures. It is up to you to get those crystals out…
Other
Q: Where can I synthesize items?
A: If your current class is one of the Disciples of the Hand, you can perform synthesis anywhere your heart desires.
Q: Where can I mine/quarry?
A: All miners have the ability to uncover the rough locations of mining and quarry points via their Prospect and Lithoscan abilities.
Q: I’ve found a Quarry Point, but I can’t quarry!
A: Ah, but do you have a knapping hammer equipped as a secondary arm?
Q: I cannot synthesize with my secondary tool!
A: Ah, but do you have a file equipped as a secondary arm?
Q: I’ve fallen into a rift in the planet’s surface and cannot escape! Whatever should I do?
A: The Land is a treacherous place, littered hither and yon with crevices, chasms, and bottomless pits, all waiting to consume the unsuspecting passerby. If you find yourself stuck in one of these not-so-proverbial ruts, simply open up your main menu and select Return to warp back to your home point.


 I wont list them all right now as we will be going over them in full detail in the coming days but this gives you a good idea of what to expect. Keep in mind also, that you are NOT locked into one class. You can change at any time, just by switching your weapon of choice. Now, once you do swap a weapon you start out at level 1 in that new class and you have to level up that class as you would any other. But hey, no more creating 10 different characters just to level them all up. Here its one character for everything. Rather nice no?
 So lets take a closer look at a job. Mystra loves Bards. Can she play one? Yes. She starts out as a Archer but after a few levels she will get the option to upgrade to the Bard job. But what does that mean? We’ll get into the specifics later, but for now it means that she will get access to Bard specific spells and abilities but will limit here interaction with other classes. She might not be able to use some of here conjurer spells like she used too. Keep in mind that this is entirely optional. She does not HAVE to become a Bard. She can continue leveling as a archer with some conjurer abilities. This is usually better when soloing, but as you get into raiding and dungeons your group will start calling for some very job specific needs.
 The people over at 4gmaer.net have done a translation of a players experience for ffxiv into English.


 The FFXIV manual has been leaked by alpha player who has his own blog called ffxivjourney. Well this little blog has so much information people are going to love it. On top of that they give you an awesome Q and A at the very end of the manual for questions players might have. Well anyways enjoy.